Drivers are generally programs that let your attached hardware devices communicate with Windows. It is the language understood by which Windows understands what you hardwares need to do - say print for a printer, check out the pictures for your digital camera, scan for scanners and so on.
So why do we need to update the driver? Sometimes manufacturers create new drivers to fix bugs with the program. Also, they might also add new features for the hardware. There are also times they aim for compatibility, newer windows coming out tend to look for newer drivers to make it work properly.
To find out information about what hardware drives are currently on your PC follow these steps:
1) Click on your
Start button.
2) Right click on the
My Computer Icon and click
Properties 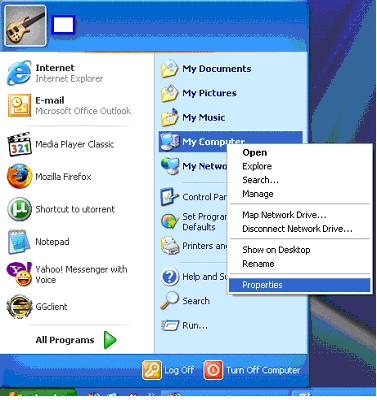
3)
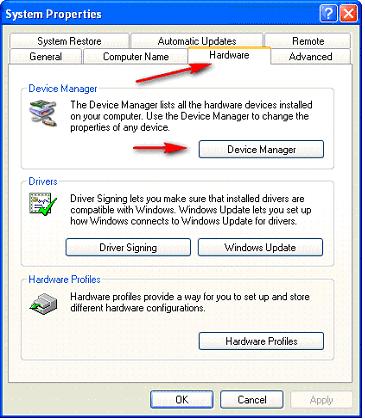
System Properties window will appear. Click on the
Hardware tab. Then click on the button Device Manager
 4)
4) The
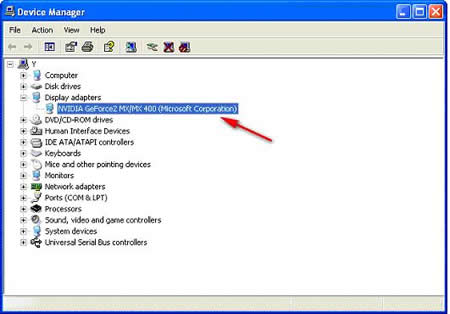
Device Manager window will open. Now from the list populated, you can see all the drivers and components installed on your computer. To pull up information about the device that you desire, click on the
plus (+) sign at the left side of the device and it will list your device model. (Notice that after clicking the plus sign it will become a
negative sign (-). In this case, by the figure below I chose to look at my video card drivers under display adapters
 5)
5) To obtain information on the driver that you desire,
Right click on the device model and click
Properties. For this example, I Right clicked on my NVIDIA GeForce2 MX/MX400 video card device. A pop up box will open with the information on that device. Click on the
Driver tab. Now on this tab you will be able to see the information about your device.
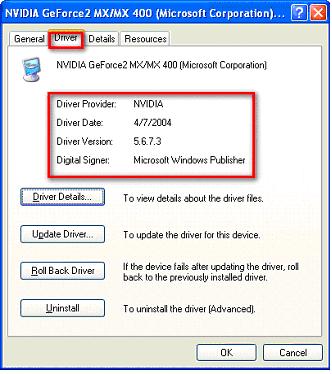 6)
6) For this example, I can now go to the website of NVIDIA to check out latest drivers that I can use. Normally, manufacturers have their database of drivers under the
Support or
Download section.
7) After downloading and saving the installation files for the driver.
Double click on the file that you downloaded. Typically, the driver file will automatically install and update your driver. If it does, then you have successfully updated your hardware driver.
NOTE: If the file that you have downloaded does not automatically install your new drivers, but instead generated a file with an .inf extension, continue with the next steps this means that you have to update your driver manually. 8 ) Repeat steps 1 to 4. GO back to
Device Manager but this time click on the
Update Driver button under the
Driver tab of the device’s properties.
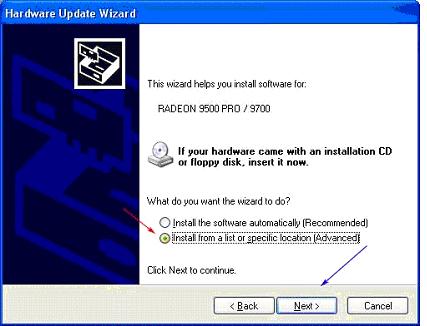
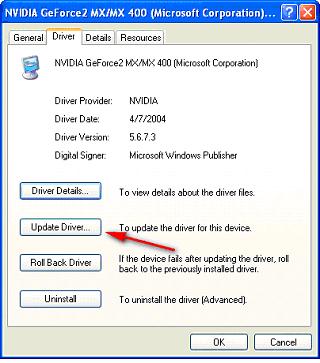 9) Hardware update wizard
 will window will appear. Click on the option labeled
Install from a list of specific location (Advanced). Then click
Next.
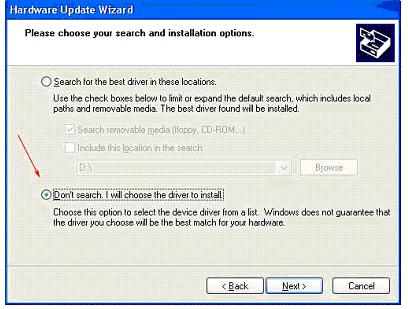
 10)
10) The wizard will let you choose your installation options. Select the option labeled
Don't search. I will choose the driver to install. Then click
Next.
 11)
11) A new window will appear. Click the button
Have Disk 12) Click the button
Browse. Now locate the file you downloaded, particularly the .inf file.
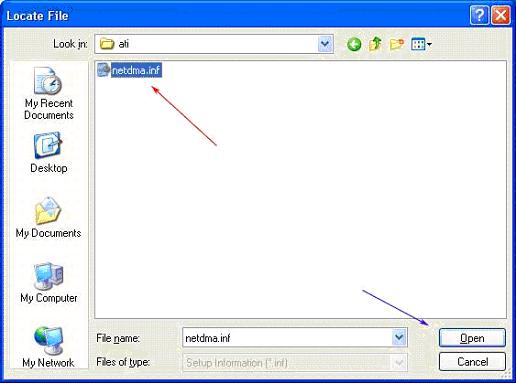 13)
13) After locating the .inf file click
Open. Then press the
OK button
14) A new window with a list of compatible drives will appear. Select the click on the
Next button. You will see that windows will update the driver on it’s own.
15) Click
Finish. You have successfully updated your drivers manually.