A hard disk partition defines the storage space on your hard drive. This process allows you to make smaller, yet more logical, hard disks. Formatting the hard drive defines the kind of file system you will need to access your hard drives and partitions.
Creating and formatting a partition in Windows
Before you can create a partition on your hard drive in Windows, you will need to install an unused hard disk or must have ample unpartitioned space availabe on your existing hard drive. You can also opt to delete an existing partition to create a new one. In this tutorial, I will partition and format the unused space from one of my hard drives. The steps here will also work with hard disks with partitions which have been previously deleted; as well as with brand new hard drives.
Follow the steps to open the Disk Management Administrative Tool to access hard disk tasks:
- Click on the START button and select the CONTROL PANEL. If you do not have this shortcut on the START menu, open MY COMPUTER and click on the CONTROL PANEL.
- Double-click on the ADMINISTRATIVE TOOLS icon and open COMPUTER MANAGEMENT.
- If the CONTROL PANEL is in Category view, click on PERFORMANCE AND MAINTENANCE, then click on ADMINISTRATIVE TOOLS, and lastly double-click on the COMPUTER MANAGEMENT icon.
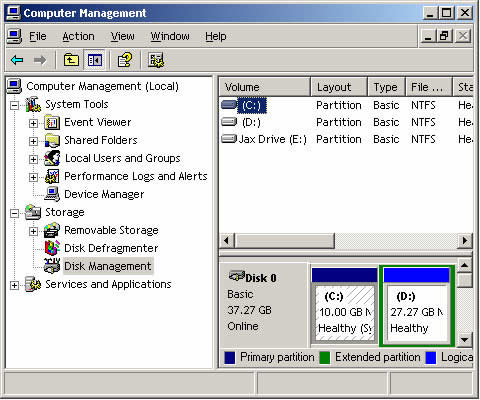
- Once the COMPUTER MANAGEMENT screen opens, just click on the DISK MANAGEMENT option; it is under the STORAGE category. A screen similar to the one below will appear.

In the disk management tool, you will see a listing of all your hard drives and how they are partitioned. The image above shows that I have two hard disks installed. The first disk, or DISC 0, has two partitions. Drive letter C has 24 GB NTFS, while Drive letter E has 87 GB NTFS. These drive letters were assigned during a previous partition. In the second drive, there is only one partition, which is the D: partition. There is 26 GB of unallocated and therefore useable space that can be used to make other partitions.
From the unused space, you can make a partition by following the steps below.
- Right click on the unallocated space.
- A new menu will come up, click on the NEW PARTITION option.
- A wizard on how you would like the partition to be created will open. On the first screen, press NEXT.
- On the second screen, you will be made to choose between a primary or extended partition. Detailed information about these kinds of partitions can be read at the tutorial listed above. Select Primary Partition, which is fine for most people, and press NEXT.
- The third screen will help you determine how much of the unallocated space you would like to use for the new partition. You can choose to use of all of space or you can stick with the default size. After you enter a size in the Partition size in MB: field, press NEXT.
- In the next screen, select a drive letter you want to assign your new partition, or you can also use the default letter given. The drive letter you chose will be how you access the partition later. Press NEXT when you are done.
- The next step will ask you how you would like the new partition to be formatted. The NTFS file system is advisable for most people. However, if you need a file system that is readable by older operating systems, such as DOS, Windows 95, Windows 98 or Windows ME, you should choose the FAT32 file system.
- You can type in a name for the Volume Label field, or you can leave it blank. This name will be associated with the new partition.
- After you press the NEXT button, a summary screen will appear. If you are satisfied with the partition you created, press FINISH to complete the creation and formatting of the new hard disk partition.
When the computer is done formatting and partitioning your hard drive, you will be prompted back to the Disk Management screen. Here you will see the new partition you have made and the drive letter on the computer. You can now begin using this drive.
Deleting a Partition in Windows
If you have an existing partition in your hard drive, and you wish to delete this for purposes only known to you, it is important for you to know that you will lose all the data in your partition.
Follow the steps below:
- Click on the START button and select the CONTROL PANEL. If you do not have this shortcut on the START menu, open MY COMPUTER and click on the CONTROL PANEL.
- Double-click on the ADMINISTRATIVE TOOLS icon and open COMPUTER MANAGEMENT.
- If the CONTROL PANEL is in Category view, click on PERFORMANCE AND MAINTENANCE, then click on ADMINISTRATIVE TOOLS, and lastly double-click on the COMPUTER MANAGEMENT icon.
- Once the COMPUTER MANAGEMENT screen opens, just click on the DISK MANAGEMENT option; it is under the STORAGE category.
- Click on the partition you wish to delete and then choose the DELETE PARTITION option.
- A confirmation box will appear, and ask you if you are sure you wish to continue. Press YES if you are only sure that you want to delete the partition. Remember, if you press yes, all the data in the partition will be deleted.
- After you press YES, the partition will be deleted. You can choose to exit the program or create a new partition.