Step 3 - Basic Information:
You will be prompted by the language information first:

simply choose the appropriate information for your computer and click next.
Very nicely, the installer now informs you that you are about to install Vista, but don't be fooled, there is much more information to be entered, before that actually happens.

click install now.
...Again you wait:

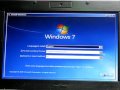
Product Key time:

enter your key located on the case of your Vista into the field provided. There is no need to enter the - characters, it will add them for you.
Once accepted, you now must agree to the Microsoft License:
 Step 4 - Installation Specific Information:
With all the boring stuff out of the way, now comes a few questions specific to your installation.
Install Type:

since I rebooted, upgrade is not an option, especially since the goal is to have XP
and Vista in the end.
Choose
Custom (Advanced).
Where do you want to install Windows:

Notice how i named the partition
WinVista since the Vista installer can read the names of the partitions, this saves me all the work of ensuring the correct partition. Select your soon to be Vista partition and click next.
Step 5 - Installing Files:
There isn't much to do here, but wait
.
..
...
.
..
...


You may even want to take advantage of this time to go do something, you have 15 - 30 minutes to waste here.
Once finished your computer will reboot for the first time:

you can wait the 10 seconds or if you are impatient, click
Restart Now 


 Information